Showing posts with label Gift Cards. Show all posts

Sunday, December 30, 2012

Christmas Cottage Magic Gift Card Holder

and another tutorial!

Hey all you bloggers out there!  Get a head start on next year's Christmas projects with this tutorial!

Using cream 'my favorite memory' journal card with red lace border, brown 'the magic of the season' phrase and red/white 'Merry Christmas' tag from the die-cut sheet.  Suggested ink: Festive Berries, Vintage Photo, Antique Linen

Doily: Spray with glimmer mist/ink with Antique Linen.  Dry and cut into 4 pieces
Flower:  Cover a1-1/2'' circle with double stick tape.  Have some glue dots handy.  Alternatively, add 1/4" wonder tape to the 12" strip of pleated ribbon.  Remove tape liner.  Using 12" piece of pleated red satin ribbon, begin adhering at the outside edge of the circle, working toward the center, adding glue dots if needed.  Glue dot a large pearl in the center.

Card Base:

  • Using the 5-1/2 x 12'' white snowflakes/red damask: score at 4'', 6'' amd 8''.  
  • Fold mountain, valley, mountain, leaving a 2'' center section.
  • Open card flat.  Mark the center line 1.5'' from each of the top and bottom edges.  Cut a slit between the two marks.  Erase the pencil marks.
  • Re-fold the card so that the center flap faces the inside front of the card.  
  • Turn over the card to the back side.  Add strong adhesive to the back short edges of the flap and near the center fold to form the pocket. 
  • Turn the card over again; then add adhesive only to the top and bottom of the LEFT SIDE of the short flap and adhere to inside front of the card.
Front:
  • Wrap 22'' of twine around journal card and tie into a bow, just below the title.  Trim ends.
  • Foam tape 'the magic of the season" phrase over the words 'my favorite memory.'
  • adhere 2 doily pieces to the back of the top and bottom of the journal card.  Attach to the card front using foam tape.
  • Glue ribbon flower onto journal card.
Inside:
  • Add red snowflake matting piece 1-3/4 x 5-1/4'' to the gift card flap
  • Ink snowflakes and adhere to make 3 two-layered pieces ( Cut from Cricut Tie the Knot at 1-1/2'')
  • Foam tape Merry Christmas ticket onto red snowflake ticket.  Wrap and knot 11'' of twine around the piece
  • Add 2 remaining doily pieces to the back, top and bottom of the red snowflake ticket piece.  Adhere piece to right side.
  • Add foam tape to the backs of the snowflakes.  Place one at the bottom right corner of the ticket piece.  Place the other two on the gift card flap.
I hope you enjoyed all the card tutorials this season.  Have a Happy New Year, everyone!

Be Inspired!  
Jules

Friday, December 28, 2012

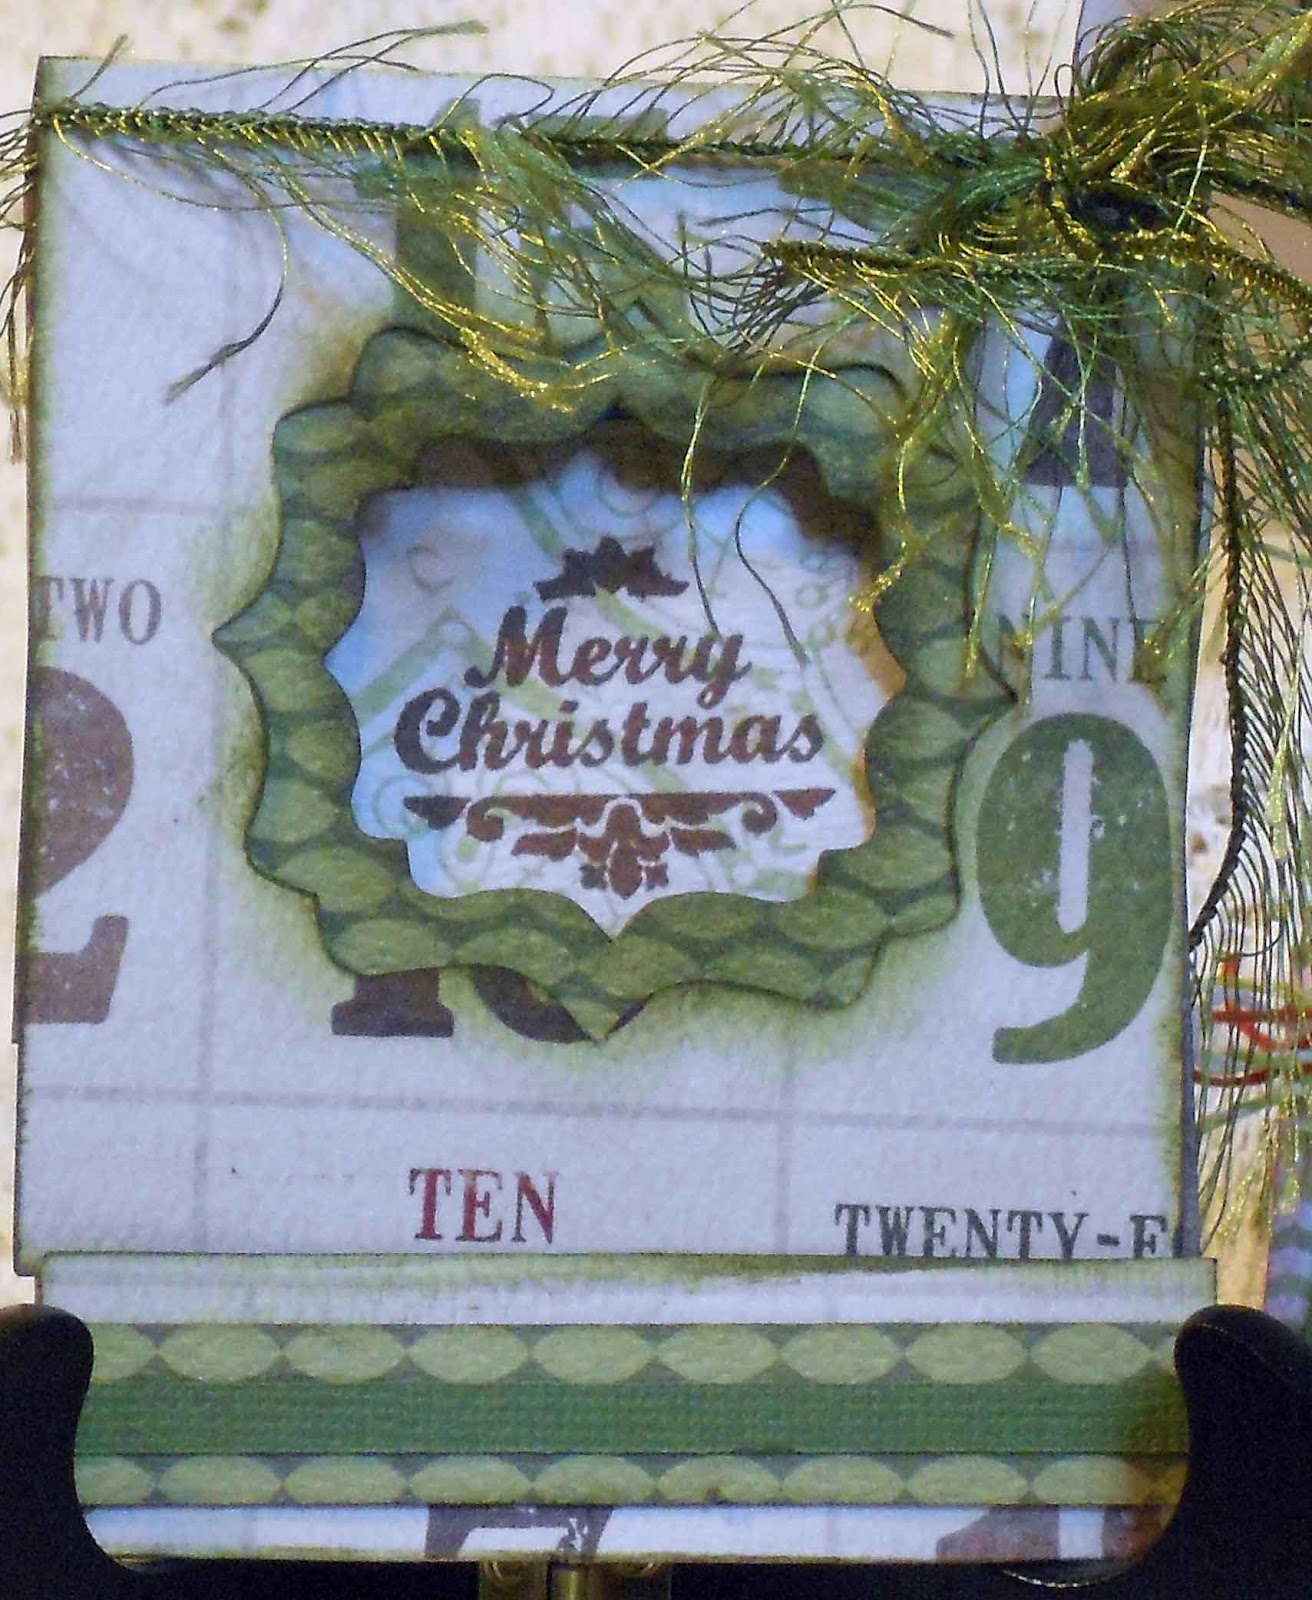
Christmas Cottage Matchbook Cash Card Tutorial


Christmas Cottage Matchbook Cash Card

Ink Suggestions: Forest Moss, Vintage Photo, Coffee Archival


Base: Score and fold into matchbook.  Staple the center of the narrow flap approximately 1/4'' from the fold.

On the inside, line up the green piece with the bracket square cut-out and adhere so that it is evenly spaced on the card front.
  • Cut down and assemble pocket and adhere with the opening facing right.  
  • Add green strips to pocket and inside front
  • Stamp Merry Christmas with Coffee Archival, so that it is centered inside the 'window'
  • Layer green strip over green printed strip and adhere to 'strike plate'
  • Wrap 18" green eyelash fiber and tie into a bow at the top right edge of the card.
This can be adapted for any occasion.  
products used:
Teresa Collins Christmas Cottage from TSS
Just Rite Stamps -Christmas Vintage Labels One from The Scrapbooking Studio
Tim Holts Alterations Die - Matchbooks
Green Card stock
Forest Moss Distress Ink
Gypsy design tool
Cricut Cart TBBM -tag pocket/blackout 3.06 w  x 6.29 t
Cricut Expression

Happy Crafting!  Be Inspired!

Jules

Wednesday, December 26, 2012

Christmas Cash Gift Card

Hello fabulous Bloggers!  I hope you all had a wonderful holiday time surrounded by loved ones!  Tutorial Time!  I did this project for Christmas 2011, but by the time I wrote the tutorial, it was long after the holidays, so it was saved for this year!  I know it is now after Christmas, but this tutorial can be used with any paper theme!

This cash holder starts out as 12" w x 7" h double-sided patterned card stock. If you edge punch the top of the card, as in this example, make it 7.5" h
  1. All pieces were inked with Ranger Festive Berries Distress Ink prior to assembly. 
  2. Score the card stock at 4 and 8 inches from the left side.
  3. Crease and fold so that the card front is facing you.
  4. Open card and make a light pencil mark about 2 1/2 inches from the BOTTOM of the right edge.
  5. From the pencil mark to the 8" score line, cut away the paper to make the angle for the cash pocket. Do not glue, yet!
  6. For the lattice trim, punch a 12" strip of paper or card stock, layer with a stripe, then a solid.
  7. Begin layering onto the card at the inside of the pocket, wrap around the back to the front and then inside, gluing as you are wrapping.
  8. Glue the short edge and bottom only to secure the pocket.  
  9. Cut a tag, layer, stamp a sentiment and add a knotted ribbon.
  10. Foam tape the tag over the end of the lattice trim.
  11. Add a layered sentiment and a bow onto the front with foam tape.
  12. Stamp and layer a sentiment to the inside, left.
  13. Make an envelope box to fit the card. This one was made with The Enveloper from Crafter's Companion.  There is a downloadable chart here to make over 100 sizes of envelopes.
  14. Punch a 12" strip with the lattice punch and layer onto a second 12 " strip.
  15. Wrap the layered band around the envelope and secure the ends to each other, not to the envelope, you want the band to slip off to open the envelope!
  16. Layer Poinsettia Silk Flowers (mine are from Paper Wishes) and silk leaves.  Attach to the seam on the band.
  17. For the envelope tag, an EK Success slim square bracket punch was cut from cream card stock and stamped with To and From stamps in Red Stazon.


Inside Pocket


Wednesday, November 28, 2012

Christmas Cottage Countdown Gift Card

Hello Bloggers!  Sharing a little card today.  Teresa Collins' Christmas Cottage Paper Pack was used for this card as well as Spellbinders Spiral Rose die and Cricut (pocket and bracket mats).

Ink : Vintage Photo 

Using 'Christmas Countdown' rectangle, green journaling ticket, green "December", Calendar and 'A Merry Little Christmas' rectangle from the die-cut sheet


Enjoy and Be Inspired!

Jules


Monday, November 26, 2012

Christmas Gift Card HoldersTutorial

Hello fabulous Bloggers!  I am sharing a tutorial for gift card holders today.  For this card, start with a strip of double-sided card stock, 5.5" x 12".  To conserve on paper, up to 6 x 12 may be used (2 cards per sheet of 12 x 12 card stock!  Yay!).

  • Score the 12" side at 4, 6 & 8''
  • Fold the card stock so that it looks like  the picture below, with the 4" and 8" scored sections meeting to form the card fold
  • Use a 2.5" circle punch to create a slot in the 2" section on the inside center of the card.  For for thicker paper, make a slit where the punch would have been used.  If a slit is cut, it can be cut so that the gift card is either vertical or horizontal.  In the photo below, the gift card is horizontal.
  • Add any mats for the center section, then glue ONLY the sides and bottom of the center section, forming the pocket to hold the gift card.
  • Decorate as desired!
  • There is a variation for this card:  the center section can be glued to either side of the card inside, so that the card pocket stays put.
The finished size is 5-1/2"h x 4"w


An A2 sized envelope will work for this, but I made a top-fold envelope to fit these cards. 
  •  start with an 8-1/4 x 9-1/2 envelope weight paper ( I use 65lb. paper) or coordinating cardstock

  •  with the 9-1/2" side at the top of the scoring tool, score at 2-1/2" and 6-3/4", top to bottom
Score @ 2-1/2 "


Score @ 6-3/4"


    • rotate to the 8-1/4" side and score at 3/4" & 6-7/8", top to bottom
    score @ 3/4''


    Score @ 6-7/8"

    • cut away the four corners, at slight angles for a nice fold
    • use a corner rounder on the 1-3/8" flap, 3/4" flap and top of the large flaps
    Showing cut-away corners and rounded edges
    • fold the two large flaps into the center and glue

    • fold the 3/4" flap up and glue
    Assembled envelope 4-1/4 x 6" when closed

    • embellish the top flap with  patterned paper to match the card to be placed inside using a 1-3/8 x 4-1/4" strip with two corners rounded to match the flap
    Tip:  If you tend to over-embellish cards that are too thick for a normal envelope, you can make an envelope box by adding 1/2'' to the length and width (now 10 x 8-3/4'').  For this size, score the 10'' side @ 2-3/4'', 3'', 7-1/4'' & 7-1/2".  Score the 8-3/4'' side @ 3/4'', 1'', 6-1/4'' & 6-1/2''.

    Cosmo Cricket and SEI papers and embellishments were used for these cards
    red ruffled ribbon: Recollections
    red glitter ribbon: JoAnn
    EK Success punch-Edger Flourish Scroll
    Wausau Pearlized card stock (red & green)
    Christmas Stamps  / Red Stazon


    I hope you enjoyed the tutorial.  Come back to the blog soon!

    Be Inspired!

    Jules

    Friday, November 2, 2012

    Teresa Collins Christmas Cottage Card

    Hello Bloggers!  Up today on the blog is a card made with the TC Christmas Cottage line and some POW! glitter paper provided for my crafting pleasure from The Scrapbooking Studio in Bloomington!


    It is a matchbook card with a few layers added in...a Fabrications brad topped off the layered die-cut flower from the line.  It was painted with Tattered Angels Glam in purchased during one of the TA classes held at The Studio last summer!  Fun!

    The next layer down is the POW paper.  It is very glittery!  The matting layers were reversed for the "strike" area on the matchbook and it was topped with a stamp from "Just Rite" (CR-03820 Christmas Vintage Labels One) and die cut with a matching die from Spellbinders Antique Labels One.

    A closer look at the dimension...


    The inside is layered with a gift card pocket and more vintage label dies and stamps and some gems from the TC Fabrications line.


    I must say, this was a beautiful line of papers and embellishments to work with!  Thanks TSS!


    Tuesday, July 31, 2012

    Bridal Shower Thank You Set

    Hello bloggers!  As promised, this is one of the gifts made for bonus daughter, Allison's bridal shower.
    There was really no creativity here.  The cards and envies were from a Teresa Collins Mr. & Mrs paper crafting set.  They were die cut, so it was just punch and fold.  Sentiments were included to make four different types of cards.  All of these were thank yous matted with purple and a sheer organdy ribbon tied on.  Done!  I promise, the next post will wow you just a little more than this one.

    Thanks for stopping by today.  Be Inspired.  Jules

    Wednesday, January 25, 2012

    Gift Card Set

    Hello Bloggers!  Sharing a gift project with you today.  The card set (sorry, only pic I have) fit perfectly into the box (after a whole lot of experimentation!) cut from Tags, Bags, Boxes & More cart from Cricut on Quick Quotes papers Ode to Joy line.  The flowers were punched and dry embossed from coordinating papers.  After this project was completed, I had secretly wished I had made all the cards to match the packaging.  That is a project for another day!


    The two cards on the left were made from Karen Foster papers and matching stickers from my LSS, Scrapbook Dreams.  The gold card has Heidi Grace papers and HUGE bling on the Paper Studio flowers(!).  It has stamped sentiments from Paper Wishes on it.  The purple card has a white base, embossed with a Big Shot embossing plate, then tapped Purple Passion Chalking ink from Quick Quotes over it.  The mat layers were cut from Spellbinders Nest-abilities dies.  The layers were cut from lavender card stock and a very tiny blue and lavender check pattern, then cut apart and placed as shown.  The flower started out white and was also colored with the purple ink, embellished with a butterfly brad and, of course, some purple satin ribbon!  Enjoy and thanks for peeking in today!