Showing posts with label Big Shot. Show all posts

Friday, December 28, 2012

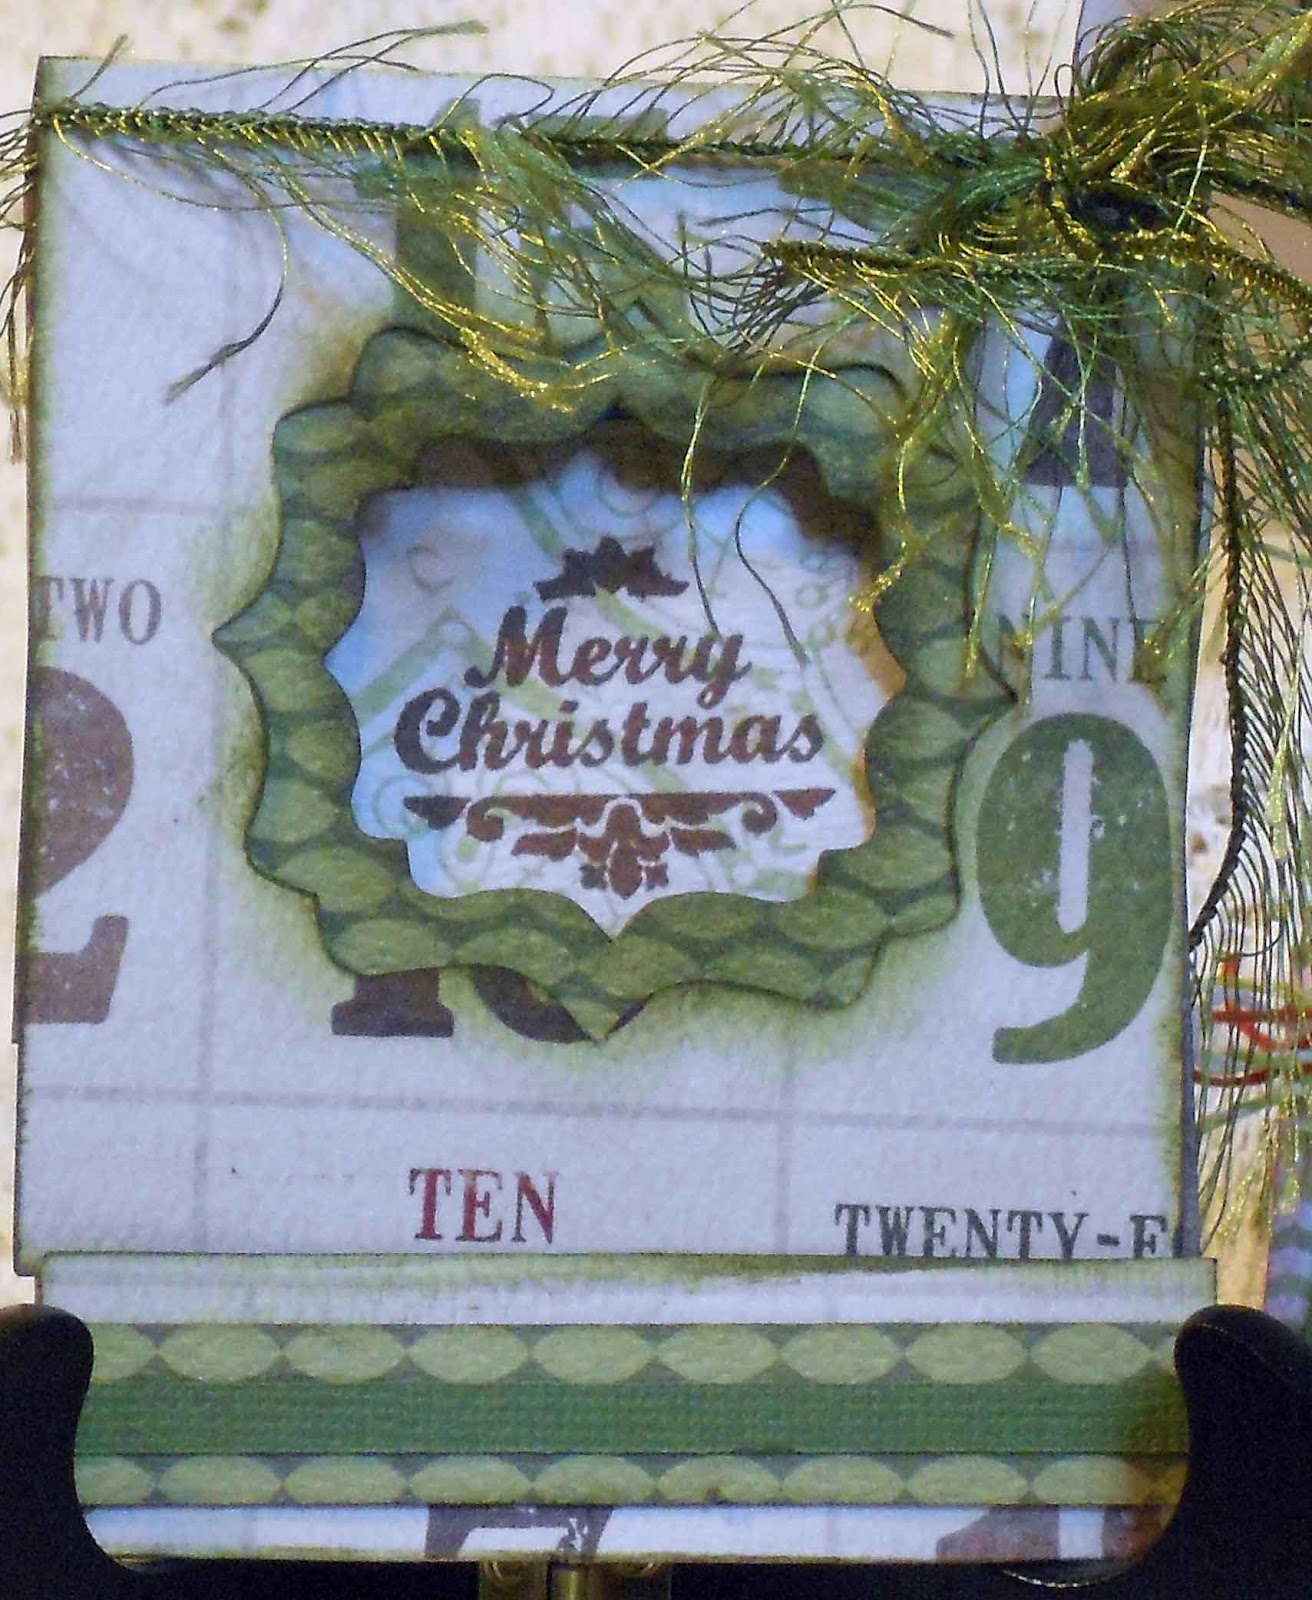
Christmas Cottage Matchbook Cash Card Tutorial


Christmas Cottage Matchbook Cash Card

Ink Suggestions: Forest Moss, Vintage Photo, Coffee Archival


Base: Score and fold into matchbook.  Staple the center of the narrow flap approximately 1/4'' from the fold.

On the inside, line up the green piece with the bracket square cut-out and adhere so that it is evenly spaced on the card front.
  • Cut down and assemble pocket and adhere with the opening facing right.  
  • Add green strips to pocket and inside front
  • Stamp Merry Christmas with Coffee Archival, so that it is centered inside the 'window'
  • Layer green strip over green printed strip and adhere to 'strike plate'
  • Wrap 18" green eyelash fiber and tie into a bow at the top right edge of the card.
This can be adapted for any occasion.  
products used:
Teresa Collins Christmas Cottage from TSS
Just Rite Stamps -Christmas Vintage Labels One from The Scrapbooking Studio
Tim Holts Alterations Die - Matchbooks
Green Card stock
Forest Moss Distress Ink
Gypsy design tool
Cricut Cart TBBM -tag pocket/blackout 3.06 w  x 6.29 t
Cricut Expression

Happy Crafting!  Be Inspired!

Jules

Monday, November 5, 2012

Paper Wishes Color Me...

Un-colored!  Hey, everyone! Another wedding card up for viewing on the blog today!

The base is purple card stock with a layer of plain vellum,  printed heart vellum and an Ebony Color Me Lace card topper.  You gotta try these card toppers from Paper Wishes!  Click the link to see more. You can use any kind of color you want to achieve your look (as I did a few posts back), although for this, one I decided not to color it at all!

The center of the card topper was cut out with an exacto-knife so there would be a "window."  A Spellbinders Fancy Tags 2, cut with the Big Shot,  and adorned with matching pearl bling, created the focal.


A triple loop purple satin bow, adorned with Jenni Bowlin and Maya Road Pins and a double heart charm, trimmed the right side of the card front.


The card inside was vellum layers and cardstock, cut with Spellbinders Labels Eight and another Fancy Tags 2.  The Congratulations banner was part of the Ebony Color Me set.


A little pocket for some cash...EK Success Edger Scroll & Hearts punch made the pretty trim.

This is what the card looks like when opened...

The card was a little thick with the bow on front, so I made an envelo-box with a Martha Stewart Scoreboard, added a belly band using EK Success Rose Bush Large Slim Punch, Anna Griffin flower and punched labels.

The inside of the envelope was lined with lavender glimmer paper and purple card stock.


Thanks for peeking in today!

Be Inspired!

Jules


Tuesday, September 18, 2012

BoBunny Apple Cider Layouts

Hello Bloggers!  Happy Tuesday!
Up on the blog today is the final design team project for September from The Scrapbooking Studio in Bloomington.  BoBunny Apple Cider papers, stickers, chipboard and trinkets were used on these projects, along with some burlap from my stash!  Something I really liked about this line was how it helped me take non-fall photos and turn them into fall layouts!  What?  Really!  It's true!

Each member of  the design team was also given paint to work with this month.  I received a Butterscotch Acrylic Paint Dabber from Adirondack.

A brick stencil and the butterscotch paint was used over the photo background.  Additional paint was used on the edges of everything, including a few swipes on the background paper.  I was a little hesitant, as I had never tried this directly onto a photo ~ glad it wasn't a disaster!   

A little trinket from the Apple Cider line anchored the right side of the layout.

A closer look at the title, made from the sticker sheet letters, border sticker, patterned papers and chipboard pieces, foam taped onto the layout.


The corner flourish on the mat for the main photo was cut so that the photo would slip under it...and a little detail on the "brick-work."


This layout is the same kid in the first layout, only 24 years older!  This is actually a spring photo, but the orange shirt he wore that day just popped when the papers were layered behind it!

The title for the second layout uses a little more burlap, this time it was painted over Tim Holtz alpha masks.


 To mimic the flourish pattern on the chipboard journaling piece, the burlap"ribbons" were painted and then very lightly stamped with a Tim Holtz Elegant Flourish stamp.  The photo did not pick it up - it is very faint.  All the burlap pieces were then  inked with Walnut Stain Distress ink.

The chipboard pieces, as well as the leaf die cuts (photo at right ) were "glammed" with Tattered Angels Golden Goddess Glam.  

In the photo, right, the scallop dotted piece was cut with a Sizzix Giant Scallops die and two sets of leaves were cut with a die from Extended Cuts - Fall Leaves and Acorns.  Before the leaf die cuts were "glammed," all the embossed texture was drawn in with a brush marker and the edges were inked with Rusty Hinge.


 Stop by The Scrapbooking Studio today to get your BoBunny supplies before they are all gone!


Thanks for stopping by today!
Be Inspired!
Jules


Sunday, September 2, 2012

Quick Quotes and Spellbinders Dies...

...make some great looking cards!  Just look at this beauty up today!


One of my dear friends retired this past week, so this is what I came up with to send her off into the wonderful world of retirement (I am only guessing that it is wonderful, as I wouldn't know from personal experience!).  The base is Quick Quotes' Julie je t'aime JT100.  On top of that is a layer of lavendar card stock and an old card front cut from the two largest Spellbinders Nestabilities Label Eight.

After the pieces were cut and embossed with the die, they were left in the die and Milled Lavendar Distress Ink was blended onto the edges.  A triple-loop bow using that great peg bow maker was made from Sugar & Spice ribbon (purchased at Michael's) and wrapped around the top layer.


The top layer and the sentiment were foam taped onto the lavendar layer.

Butterflies were punched with a three-layer butterfly punch from EK Success (see it at Jo-ann).  The centers were adorned with purple bling and the wings of the single-layer butterflies were accented with aqua nailhead stickers from Mark Richards (Hobby Lobby).  The three-layer butterfly on the top right of the card was embossed with an embossing folder (all three layers together).

 A closer look at the details...The embossed butterfly below.


This is the inside of the card.


An envelo-box was made from more JT100.  A belly-band was made from a strip of Quick Quotes Andrew Avenue AA200 - loved that paper line - good thing I still have a great stash of it!  :), along with a strip of JT100 and a layer of ribbon.  A tag was punched from the reverse side of the JT100 and attached to the triple-loop bow with purple scrapper's floss.

A special personal note to my friend was written on a couple of journaling notes and attached to the inside left of the card, in case she wanted to remove them.

To all my blogger friends out there, have a safe, happy and labor-free Labor Day!

Until next time...Be Inspired!  Jules

Thursday, August 23, 2012

Chocolate Dipped Artful Cards - 2

 Hey, all you fabulous bloggers out there!  News to share today!  My design team gig with The Scrapbooking Studio has been extended, only now I am on the team for the Bloomington store!


Congrats to all the other ladies on the team!  Cannot wait to get started!


This is another pair of  cards made with Artful Card kits from Paper Wishes! 

As with the cards on a previous post, A2 cards and 2 patterned papers were run through the Big Shot with the Sizzix Card Fronts, A2 Eyelet & Ornate die.   after die-cutting the papers, they were put into the paper trimmer and cut about 2/3 down from the top, so that they could be alternated on each card.

The die cuts and sentiments were layered up with foam tape for lots of dimension. All the pieces were inked with Vintage Photo Distress Ink.  No ribbon, no bling, but they really didn't need it!


Thanks for stopping by the blog today!  Be Inspired!  Jules

Tuesday, August 21, 2012

Chocolate Dipped Artful Cards -1

Hello bloggers!  Well, I finally got to play with my Artful Card kits from Paper Wishes!  The kits come with coordinating card stock die cuts, papers, sentiments and ribbon ~ and they are oh, so  pretty!  This one is called Chocolate Dipped.

A2 cards and 2 patterned papers were run through the Big Shot with the Sizzix Card Fronts, A2 Eyelet & Ornate die.   after die-cutting the papers, they were put into the paper trimmer and cut about 2/3 down from the top, so that they could be alternated on each card.  Button die-cuts trimmed with ribbon were placed across the 'seam' with foam tape and two more die cuts were layered on for lots of dimension.  

The stamps used for the sentiments were stamped with Versafine Vintage Sepia.  The stamp sets used were, of course from Paper Wishes:  Birthday Greetings and Stamp & Punch.


After the greeting was stamped on the patterned paper, it was punched with a 2-1/2"  punch. A 3" scallop circle punch was used for the mat layer.  After I saw the inside photo, I decided it needed a piece of knotted ribbon attached ~ sorry, no pic!


This is a shot of the dimensional elements.


This is the second card, with more layered die cuts and a pretty bow, laced through one of the die cuts.
...and the inside...

All the pieces were inked with Vintage Photo Distress Ink.  I am really happy with the turnout.  Stay tuned to the blog for more Chocolate Dipped cards, coming soon!

Be Inspired!  Jules

Monday, August 20, 2012

The last of the 7gypsies cards...

Thanks for stopping by the blog today!  I have more 7gypsies cards to share. Are you getting tired of them, yet?  I promise, this is the last post!


 As with the previous cards, kraft card stock was run through the Big Shot with the Sizzix Card Fronts, A2 Eyelet & Ornate die.   For these, one of each style was cut.

A piece of patterned 7gypsies paper was cut to fit just above the ornate edge, then edge-punched with an EK Success Edger punch, Elegant Flourish Scroll.  The sentiment (an old SEI stamp) was stamped with Distress Embossing Ink and heat embossed with black embossing powder.  All the card edges were inked with Victorian Velvet Distress Ink and a blending tool.


For this card, another piece of patterned paper was cut to fit the top 2/3 of the card base.  To that, two edger punches from EK Success were used to keep the circle theme going ~  Donut Chain and Bubbles.  The little frame was fussy-cut from another piece of the 7gypsies patterned paper and letter stickers were used to spell "thank you."  Foam tape was used to give the sentiment some dimension.


A little ribbon from my stash tied into a triple bow with Becca's  Peg Bow Maker, topped off each card.

Thanks for stopping by today!  Be Inspired!  Jules

Sunday, August 19, 2012

7gypsies Embossed Ornate Cards

Hello scrappy blog friends! Happy Sunday!   This is the second set of  cards from the 7gypies Trousseau Collection from the Scrapbooking Studio.  For these cards, A2 cards and 7g background papers were run through the Big Shot with the Sizzix Card Fronts, A2 Eyelet & Ornate die. 

The Thank You focal, again, an old SEI stamp set (Windsor?) was stamped in Versafine Vintage Sepia, then the scrollwork was added around the edges with Victorian Velvet Distress Ink.  The ovals were punched with Marvy Uchida oval punches in 2.5 & 3 " sizes, then tapped on the edges with Victorian Velvet.

The background papers were run through the Big Shot with A2 embossing folders from Sizzix : Thanks set and Tim Holtz Fancy Frame.  Victorian Velvet ink was tapped over the top of the embossed images to add dimension.

A little ribbon from my stash (dotted ribbon below is from Quick Quotes), tied into a double bow with Becca's  Peg Bow Maker, topped off each card in this set of four.


Thanks for peeing in today!  Be Inspired!  Jules

Friday, August 17, 2012

7gypsies Embossed Eyelet Cards

Hello fab bloggers - Back today with some more 7gypsies "Trousseau Collection" from The Scrapbooking Studio.  

For these cards, A2 cards and 7g background papers were run through the Big Shot with the Sizzix Card Fronts, A2 Eyelet & Ornate die.  This is a great way to mass produce cards.  There are two card styles on the die, so 2 cards or 6-8 card fronts can be cut all at once!

For the Thank You focal, an SEI stamp set (Windsor?) was stamped in Versafine Vintage Sepia, then the scrollwork was added around the edges with Victorian Velvet Distress Ink.  The ovals were punched with Marvy Uchida ovals in 2.5 & 3 " sizes, then tapped on the edges with Victorian Velvet.

The background papers were run through the Big Shot with A2 embossing folders from Cuttlebug (Birds & Swirls) and Sizzix (Regal Flourishes).  Victorian Velvet ink was tapped over the top of the embossed images to add dimension.

A little ribbon from my stash (dotted ribbon below is from Quick Quotes), tied into a double bow with Becca's  Peg Bow Maker, topped off each card in this set of four.  A little more info on this bow maker.  I am really picky about my bows and this little jewel takes all the muss and fuss away, and the bows come out beautifully!  Check out Becca's blog here to see her beautiful creations!


Thanks for peeking in on the blog today!  Be Inspired!   Jules


Thursday, August 2, 2012

Antique shoe clip tag


Hello there!  Thanks for stopping by for some inspiration today! Up on the blog today is a tag made for a friend.  She wanted an antique shoe clip made into a display piece and this is the result...

There is alot going on here.  First, Tim Holtz Distress Stains (Barn Door, Snow Cap & Tattered Rose were 'scribbled' onto a craft mat.  The tag was dragged through and dried with a heat gun several times until the color was just right.  (Hint:  there is no right!).  Tim Holtz' Urban Tapestry and Artful Flight stamps were used randomly over the tag in Ranger Coffee Archival Ink.  A piece of Prima patterned paper was die-cut with Tim Holtz Plaque & Postage die, then embossed with a Cuttlebug  embossing folder (Birds & Swirls).  One of the birds was colored with Cape Cod Smooch Ink and the vines were tapped with  Green-with-Envy-PowderPuff-Chalking-Inks .  All the edges were then distressed with Tim Holtz' Tonic distress tool and inked with Vintage Photo Distress Ink and attached to the tag top.


Now comes the fun...The shoe clip was attached to a Prima paper flower by cutting a slit into one of the petals.  The flower was attached to the card with foam dots.  Creme small rose ribbon from Paper Wishes was stained with Spun Sugar Distress Stain and placed at the seam of the die-cut piece.  Three single roses were also stained and red pearls attached to centers.


For the bottom of the tag, a vellum quote from Quick Quotes was torn and inked, then wrapped around the bottom.  Vellum glue dots held it to the tag until the large focal and the three little roses were attached.


Two holes were punched at the top of the tag.  Basic Grey fibers and a Tim Holtz bauble were tied on to finish things off.


To make the tag extra sturdy, a piece of patterned Prima paper was added to the back.  Three easels were cut with Tim Holtz' Small Easel die, one out of chipboard and two out of patterned paper.  The patterned paper was glued to each side of the easel and attached to the back of the tag.  

My friend loved the tag and is giving it to her mother for a birthday gift.

Hope you all were inspired today. 
Thanks for stopping by!

Be Inspired!
Jules 

Wednesday, August 1, 2012

Wedding Mini Album

Hello Bloggers !  This is gonna be a really long post with lots of photos and descriptions, so grab a drink, sit back and scroll!  Click on any photo for a better view and click on the links to see more product.

This mini, again, was made for bonus daughter, Allison's bridal shower gift.  The pattern is from Laura Dennison's website.  She is an amazing designer!  The album is appropriately named  Happily Ever After!

This is the cover.  It is layered with Teresa Collins Mr. & Mrs. papers, lace and a scroll band cut with an EK Success large edger punch found here.  The Prima bling (Say it in Crystals-Vintage Swirl) was then layered on.  The flowers were die cut on my Big Shot with Tim Holtz tattered flowers dies and Spellbinders foliage die.  All were dry-embossed and layered for dimension.  Pearl stamens were added to the larger flower centers.

These two are the bride's pages, the veil on the left and the train on the right.  The black binding tabs were cut from Spellbinders Donna Salazar's Creative Page Tabs die using Core'dinations black pearl papers.  The papers are heavy-weight and hold up well for this purpose, plus they give a little shimmer to the otherwise boring binding tabs!  The purple scallop circles and hearts were punched with Marvy Uchida punches.  The purple papers were misted with Mister Huey's Shine from Studio Calico and The Scrapbooking Studio

It's a little hard to see, but the veil is lifted and the train is pulled out for a little interactive photo placement!

The rings and the groom pages.  All of the pages have pockets on one side with photo mats tucked inside.  All the pages were edgee-punched with a Martha Stewart Doily Lace punch.

Inside the grooms' page...the "shirt collar" lifts out to a photo mat and the printed paper tucked into the "cummerbund" is also a photo mat!


For the Maid of Honor and Bridesmaids...

Best Man and Groomsmen...

The cake and the toast.  The cake layers lift out to reveal love quotes.

The inside of the Toast page...

Another look at the cover.


Allison loved the book, and since she also is a scrapper, I know as soon as her photos are received, they will be placed into this great mini!

Thanks for stopping by today.  I hope you were a little more wowed today than yesterday!

Be Inspired!  Jules