Showing posts with label Marvy Uchida punches. Show all posts

Monday, November 26, 2012

Christmas Gift Card HoldersTutorial

Hello fabulous Bloggers!  I am sharing a tutorial for gift card holders today.  For this card, start with a strip of double-sided card stock, 5.5" x 12".  To conserve on paper, up to 6 x 12 may be used (2 cards per sheet of 12 x 12 card stock!  Yay!).

  • Score the 12" side at 4, 6 & 8''
  • Fold the card stock so that it looks like  the picture below, with the 4" and 8" scored sections meeting to form the card fold
  • Use a 2.5" circle punch to create a slot in the 2" section on the inside center of the card.  For for thicker paper, make a slit where the punch would have been used.  If a slit is cut, it can be cut so that the gift card is either vertical or horizontal.  In the photo below, the gift card is horizontal.
  • Add any mats for the center section, then glue ONLY the sides and bottom of the center section, forming the pocket to hold the gift card.
  • Decorate as desired!
  • There is a variation for this card:  the center section can be glued to either side of the card inside, so that the card pocket stays put.
The finished size is 5-1/2"h x 4"w


An A2 sized envelope will work for this, but I made a top-fold envelope to fit these cards. 
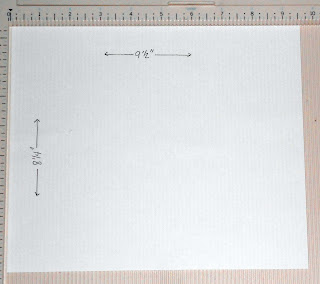
  •  start with an 8-1/4 x 9-1/2 envelope weight paper ( I use 65lb. paper) or coordinating cardstock

  •  with the 9-1/2" side at the top of the scoring tool, score at 2-1/2" and 6-3/4", top to bottom
Score @ 2-1/2 "


Score @ 6-3/4"


    • rotate to the 8-1/4" side and score at 3/4" & 6-7/8", top to bottom
    score @ 3/4''


    Score @ 6-7/8"

    • cut away the four corners, at slight angles for a nice fold
    • use a corner rounder on the 1-3/8" flap, 3/4" flap and top of the large flaps
    Showing cut-away corners and rounded edges
    • fold the two large flaps into the center and glue

    • fold the 3/4" flap up and glue
    Assembled envelope 4-1/4 x 6" when closed

    • embellish the top flap with  patterned paper to match the card to be placed inside using a 1-3/8 x 4-1/4" strip with two corners rounded to match the flap
    Tip:  If you tend to over-embellish cards that are too thick for a normal envelope, you can make an envelope box by adding 1/2'' to the length and width (now 10 x 8-3/4'').  For this size, score the 10'' side @ 2-3/4'', 3'', 7-1/4'' & 7-1/2".  Score the 8-3/4'' side @ 3/4'', 1'', 6-1/4'' & 6-1/2''.

    Cosmo Cricket and SEI papers and embellishments were used for these cards
    red ruffled ribbon: Recollections
    red glitter ribbon: JoAnn
    EK Success punch-Edger Flourish Scroll
    Wausau Pearlized card stock (red & green)
    Christmas Stamps  / Red Stazon


    I hope you enjoyed the tutorial.  Come back to the blog soon!

    Be Inspired!

    Jules

    Saturday, September 15, 2012

    BoBunny Apple Cider Altered Project

    Happy Saturday Bloggers!  Up on the blog today is one of the design team projects for September from The Scrapbooking Studio in Bloomington.  BoBunny Apple Cider papers and Butterscotch Acrylic Paint Dabber from Adirondack were used on this month's projects, with a few extra goodies from my stash!

    The paint was used in this project on the spool and the metal Tim Holtz word stick and philosophy tag.  The word stick and philosophy tag were hung on a trinket pin with jump rings and attached to the photo mat after punching two 1/16" holes.

      The photo is matted with black, and then orange Bazzill card stock.  The "stick" was a strip of patterned paper wrapped around a piece of 16-gauge wire that was laying around in my scrappy space. :)  It was glued between the card stock layers for extra dimension and to give the back of the project a finished look.

    All the papers were inked with a blending tool and Rusty Hinge Distress ink.


    The top of the spool was covered with patterned paper and a Tim Holtz reinforcer.  The spool was wrapped with brown baker's twine and glued to a chipboard apple from the paper line.

    Here is a close-up of the sticker, matted on black and foam taped on orange ovals.

    Stop by The Scrapbooking Studio today to get your BoBunny supplies!

    PS.  The lil' Pumpkin is my adorable grand-nephew, Logan.  What a cutie!  He now has a new brother, so they will provide more fodder for some future projects!  Megan, send pics!

    Stop by soon for some more BoBunny inspiration!
    Be Inspired
    Jules

    Tuesday, August 21, 2012

    Chocolate Dipped Artful Cards -1

    Hello bloggers!  Well, I finally got to play with my Artful Card kits from Paper Wishes!  The kits come with coordinating card stock die cuts, papers, sentiments and ribbon ~ and they are oh, so  pretty!  This one is called Chocolate Dipped.

    A2 cards and 2 patterned papers were run through the Big Shot with the Sizzix Card Fronts, A2 Eyelet & Ornate die.   after die-cutting the papers, they were put into the paper trimmer and cut about 2/3 down from the top, so that they could be alternated on each card.  Button die-cuts trimmed with ribbon were placed across the 'seam' with foam tape and two more die cuts were layered on for lots of dimension.  

    The stamps used for the sentiments were stamped with Versafine Vintage Sepia.  The stamp sets used were, of course from Paper Wishes:  Birthday Greetings and Stamp & Punch.


    After the greeting was stamped on the patterned paper, it was punched with a 2-1/2"  punch. A 3" scallop circle punch was used for the mat layer.  After I saw the inside photo, I decided it needed a piece of knotted ribbon attached ~ sorry, no pic!


    This is a shot of the dimensional elements.


    This is the second card, with more layered die cuts and a pretty bow, laced through one of the die cuts.
    ...and the inside...

    All the pieces were inked with Vintage Photo Distress Ink.  I am really happy with the turnout.  Stay tuned to the blog for more Chocolate Dipped cards, coming soon!

    Be Inspired!  Jules

    Sunday, August 19, 2012

    7gypsies Embossed Ornate Cards

    Hello scrappy blog friends! Happy Sunday!   This is the second set of  cards from the 7gypies Trousseau Collection from the Scrapbooking Studio.  For these cards, A2 cards and 7g background papers were run through the Big Shot with the Sizzix Card Fronts, A2 Eyelet & Ornate die. 

    The Thank You focal, again, an old SEI stamp set (Windsor?) was stamped in Versafine Vintage Sepia, then the scrollwork was added around the edges with Victorian Velvet Distress Ink.  The ovals were punched with Marvy Uchida oval punches in 2.5 & 3 " sizes, then tapped on the edges with Victorian Velvet.

    The background papers were run through the Big Shot with A2 embossing folders from Sizzix : Thanks set and Tim Holtz Fancy Frame.  Victorian Velvet ink was tapped over the top of the embossed images to add dimension.

    A little ribbon from my stash (dotted ribbon below is from Quick Quotes), tied into a double bow with Becca's  Peg Bow Maker, topped off each card in this set of four.


    Thanks for peeing in today!  Be Inspired!  Jules

    Friday, August 17, 2012

    7gypsies Embossed Eyelet Cards

    Hello fab bloggers - Back today with some more 7gypsies "Trousseau Collection" from The Scrapbooking Studio.  

    For these cards, A2 cards and 7g background papers were run through the Big Shot with the Sizzix Card Fronts, A2 Eyelet & Ornate die.  This is a great way to mass produce cards.  There are two card styles on the die, so 2 cards or 6-8 card fronts can be cut all at once!

    For the Thank You focal, an SEI stamp set (Windsor?) was stamped in Versafine Vintage Sepia, then the scrollwork was added around the edges with Victorian Velvet Distress Ink.  The ovals were punched with Marvy Uchida ovals in 2.5 & 3 " sizes, then tapped on the edges with Victorian Velvet.

    The background papers were run through the Big Shot with A2 embossing folders from Cuttlebug (Birds & Swirls) and Sizzix (Regal Flourishes).  Victorian Velvet ink was tapped over the top of the embossed images to add dimension.

    A little ribbon from my stash (dotted ribbon below is from Quick Quotes), tied into a double bow with Becca's  Peg Bow Maker, topped off each card in this set of four.  A little more info on this bow maker.  I am really picky about my bows and this little jewel takes all the muss and fuss away, and the bows come out beautifully!  Check out Becca's blog here to see her beautiful creations!


    Thanks for peeking in on the blog today!  Be Inspired!   Jules


    Wednesday, August 1, 2012

    Wedding Mini Album

    Hello Bloggers !  This is gonna be a really long post with lots of photos and descriptions, so grab a drink, sit back and scroll!  Click on any photo for a better view and click on the links to see more product.

    This mini, again, was made for bonus daughter, Allison's bridal shower gift.  The pattern is from Laura Dennison's website.  She is an amazing designer!  The album is appropriately named  Happily Ever After!

    This is the cover.  It is layered with Teresa Collins Mr. & Mrs. papers, lace and a scroll band cut with an EK Success large edger punch found here.  The Prima bling (Say it in Crystals-Vintage Swirl) was then layered on.  The flowers were die cut on my Big Shot with Tim Holtz tattered flowers dies and Spellbinders foliage die.  All were dry-embossed and layered for dimension.  Pearl stamens were added to the larger flower centers.

    These two are the bride's pages, the veil on the left and the train on the right.  The black binding tabs were cut from Spellbinders Donna Salazar's Creative Page Tabs die using Core'dinations black pearl papers.  The papers are heavy-weight and hold up well for this purpose, plus they give a little shimmer to the otherwise boring binding tabs!  The purple scallop circles and hearts were punched with Marvy Uchida punches.  The purple papers were misted with Mister Huey's Shine from Studio Calico and The Scrapbooking Studio

    It's a little hard to see, but the veil is lifted and the train is pulled out for a little interactive photo placement!

    The rings and the groom pages.  All of the pages have pockets on one side with photo mats tucked inside.  All the pages were edgee-punched with a Martha Stewart Doily Lace punch.

    Inside the grooms' page...the "shirt collar" lifts out to a photo mat and the printed paper tucked into the "cummerbund" is also a photo mat!


    For the Maid of Honor and Bridesmaids...

    Best Man and Groomsmen...

    The cake and the toast.  The cake layers lift out to reveal love quotes.

    The inside of the Toast page...

    Another look at the cover.


    Allison loved the book, and since she also is a scrapper, I know as soon as her photos are received, they will be placed into this great mini!

    Thanks for stopping by today.  I hope you were a little more wowed today than yesterday!

    Be Inspired!  Jules

    Monday, July 9, 2012

    Retirement Gift Project

    Hello awesome bloggers!  Today's post is the gift I made for my 'retiring' friend!  Before you scroll down, guess what is inside!  I you read this blog regularly, you would have seen something similar on a previous post!


     The lid is off...still wondering?

    Yes, it is a stationery box, partially made from an SEI template.  A few modifications were made to make this one my own:  Loopy ribbon, scalloped edges everywhere.  I has three pockets, address book, pen holder and pocket for postage stamps! 

    Address book open...

    Pocket in the back will hold A2 cards perfectly or even 5x5's.  The left pocket is the perfect size for a 3x3 pad of sticky notes, or a stack of gift cards.


    Six greeting cards were made for use on any occasion and placed into the back pocket.  They are blank inside.

    The outside view with layered flowers and bling from Prima.  The box bling is from Hobby Lobby.


    If any of you out there are Quick Quotes fans, the papers used for this project are from an old Quick Quotes line called Bandana-Rama.  The colors are just so cheery!

    Quick Quotes products are really the main reason I fell in love with scrapbooking!

    Stop by the blog any time!  Be Inspired!  

    Jules


    Tuesday, May 1, 2012

    Americana Celebration

    Hello there, fabulous Bloggers!  Thanks for stopping by today!

     The card being shared with you today was made from scraps of cream card stock, red and navy blue glimmer paper and packaging from a Quick Quotes Just Jackson paper pack!  Add in Martha Stewart Double Loops Punch Around the Page punches, See D's stamps, Tiny Words and Images stamp from Paper Wishes, some REALLY OLD star and flag brads from Karen Foster, star shaped paper clip (from where, I have no idea), red button and Making Memories(?) star ribbon!  

    Can you tell where the packaging is?  It is behind the sentiment label and on the banner at the bottom!  It was fun to layer the brad onto the button and then onto the star for the banner embellishment!  The ribbon was looped and stapled on.

    That's all for today!  Thanks for stopping by, and...be inspired!  Jules

    Sunday, April 22, 2012

    Graphic 45 Squeeze Box Altered Project

    Hello, fabulous Bloggers!  I am back again today with another Graphic 45 project for The Scrapbooking Studio design team.  One of the products in my kit this month was the G45 metal film cannister...hmmm, I thought, "how could I make it different?"  Well, it's different alright!  Is an old fashioned squeeze box different enough for you?

    Side View

    Front


    Back


    Top View
    Here are a few of the details: the edges of the cannister were wrapped with ribbon using wonder tape, the "straps" were salvaged from an old purse and attached with pop rivets (thanks again to Jeff & Cathy at Scrapbook Dreams for attaching the straps and for the fabulous acrylic stands!), the tabs inside and circle shapes on the outsides were cut with Plantin Schoolbook and Gypsy Wanderings carts on the Cricut Expression.  All the papers were inked with Rusty Hinge Distress Ink. The squeeze box portion was adhered with X-press It double sided tape.  It worked great and held the project together really well.

    G45 Papers used for this project are from the Olde Curiosity Shoppe line:  Parlor Wall, Butterfly Specifics, Genuine Article, Bazaar of Wonders, Counting Down and Race for Time.  Also used were Chipboard Die Cuts 1 & 2 and Cardstock Stickers.

    The inside photo mats:

    All the G45 product shown is available in stock at The Scrapbooking Studio...I expect them to run out soon!  Ha!  This was a really fun project!  Maybe I'll make a class out of it.....hmmm, food for thought!

    Thanks again for stopping by the blog today, and...Be Inspired!   Jules


    Sunday, February 26, 2012

    Bundle of Mischief Cards


    Hey Bloggers!

    These are fast and easy cards made with a few stamps or computer printing, circle and scallop punches, scallop-edge scissors, ribbons buttons and scrapper's floss.


     The front panels of the cards were dry embossed with Fiskars embossing plates on the Big Shot, although the photos do not show it well.  I am trying to get better at photography!

    Thanks for stopping by tonight!  Jules