Showing posts with label Stamp. Show all posts

Monday, March 18, 2013

Quick Quotes Altered Canvas Mini

Hello out there!  It has been a while since my last post, so it's time to share a project with you.  This one was very special.  My niece lost a very dear friend and had very few photos of him, so I put together this little canvas kit from Quick Quotes for her to look at whenever she was missing her friend.
All the chipboard pieces (in silver) were inked up with Silver Metallic Stazon.  After the ink was dry, Tim Holtz Fabulous Flourishes stamps were used on the page tabs and black metallic paper was placed behind the cut-out letters.  The chipboard photo frames were done in the same technique, using a  stamp from Hot Off The Press, Artful Collection. A close-up is below.


Inside Pages:


A closer look at the metallic ink with the stamping.

The entire project was inked with Quick Quotes Midnight Confession Powder Puff Chalking Ink.

Thanks for stopping by the blog today!
Be Inspired!
Jules

Product Links:


Friday, December 28, 2012

Christmas Cottage Matchbook Cash Card Tutorial


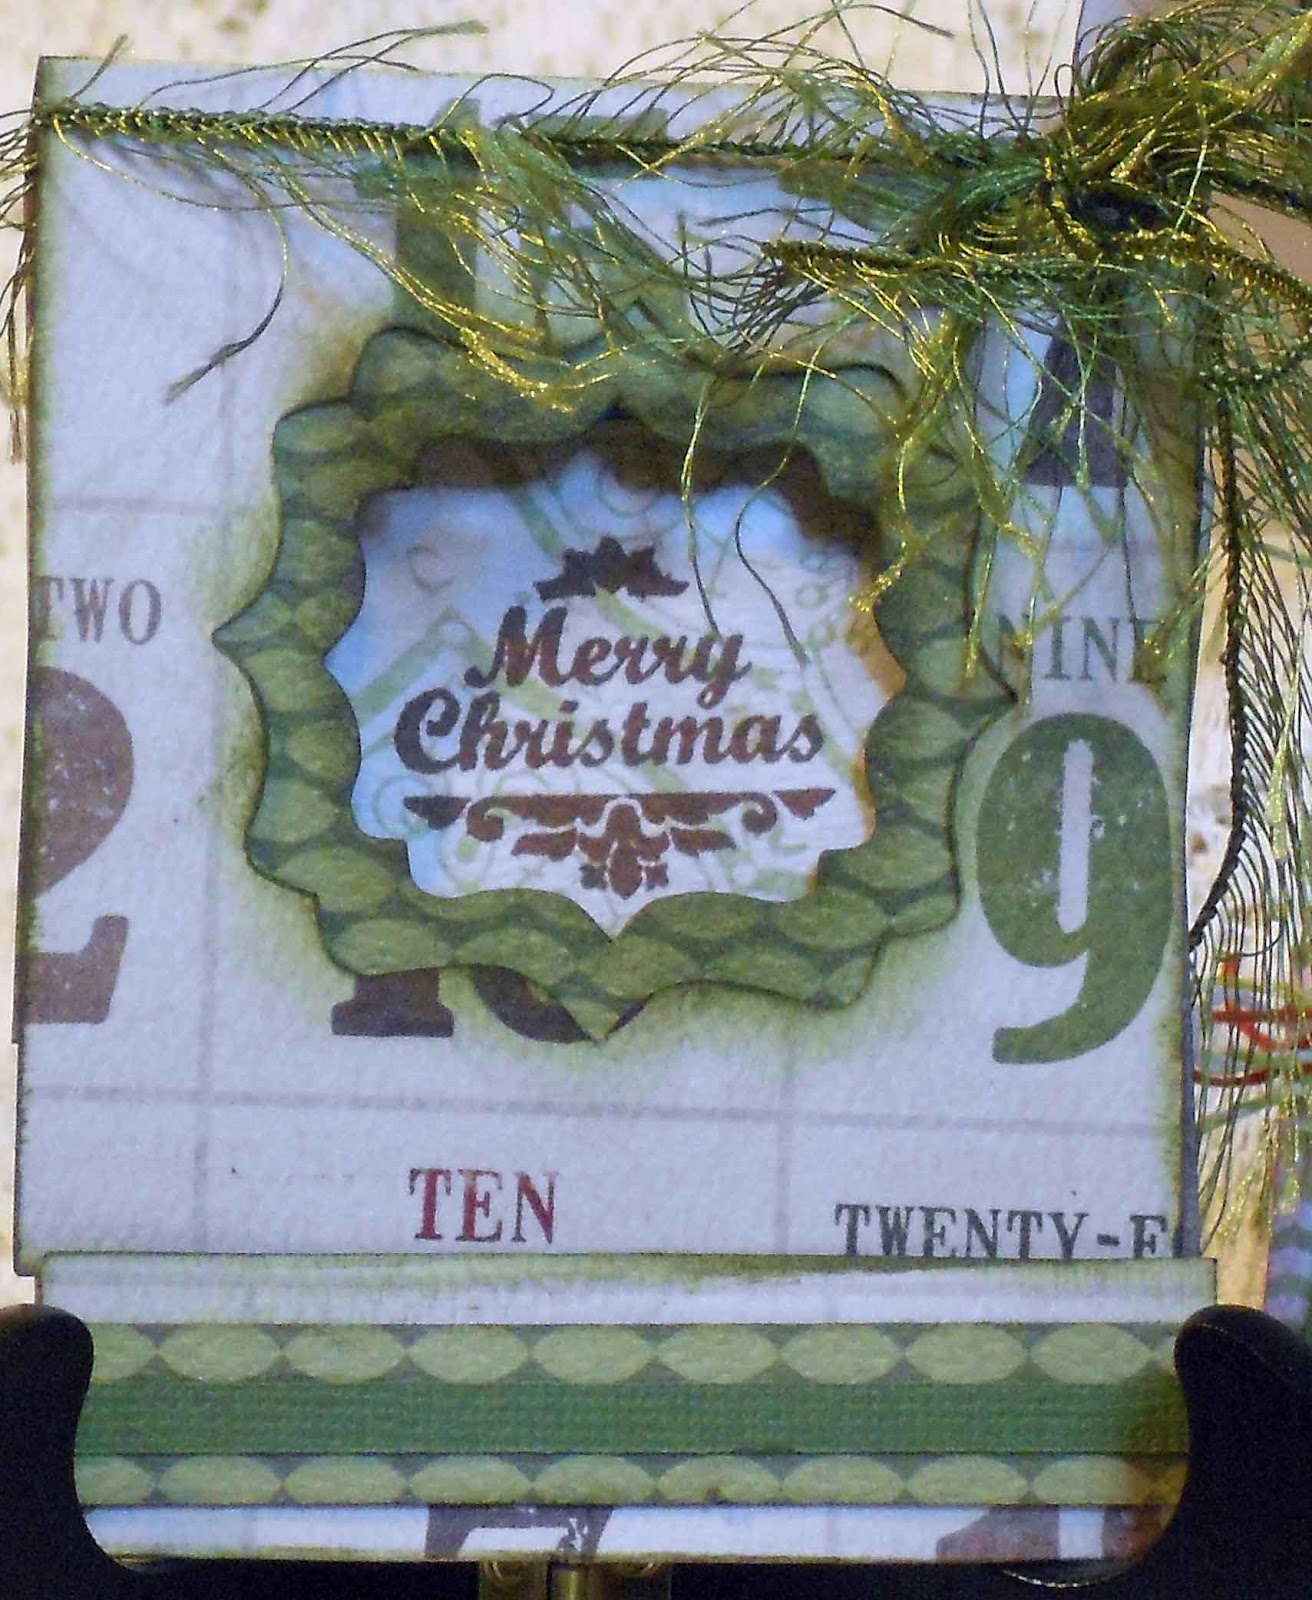
Christmas Cottage Matchbook Cash Card

Ink Suggestions: Forest Moss, Vintage Photo, Coffee Archival


Base: Score and fold into matchbook.  Staple the center of the narrow flap approximately 1/4'' from the fold.

On the inside, line up the green piece with the bracket square cut-out and adhere so that it is evenly spaced on the card front.
  • Cut down and assemble pocket and adhere with the opening facing right.  
  • Add green strips to pocket and inside front
  • Stamp Merry Christmas with Coffee Archival, so that it is centered inside the 'window'
  • Layer green strip over green printed strip and adhere to 'strike plate'
  • Wrap 18" green eyelash fiber and tie into a bow at the top right edge of the card.
This can be adapted for any occasion.  
products used:
Teresa Collins Christmas Cottage from TSS
Just Rite Stamps -Christmas Vintage Labels One from The Scrapbooking Studio
Tim Holts Alterations Die - Matchbooks
Green Card stock
Forest Moss Distress Ink
Gypsy design tool
Cricut Cart TBBM -tag pocket/blackout 3.06 w  x 6.29 t
Cricut Expression

Happy Crafting!  Be Inspired!

Jules

Monday, November 26, 2012

Christmas Gift Card HoldersTutorial

Hello fabulous Bloggers!  I am sharing a tutorial for gift card holders today.  For this card, start with a strip of double-sided card stock, 5.5" x 12".  To conserve on paper, up to 6 x 12 may be used (2 cards per sheet of 12 x 12 card stock!  Yay!).

  • Score the 12" side at 4, 6 & 8''
  • Fold the card stock so that it looks like  the picture below, with the 4" and 8" scored sections meeting to form the card fold
  • Use a 2.5" circle punch to create a slot in the 2" section on the inside center of the card.  For for thicker paper, make a slit where the punch would have been used.  If a slit is cut, it can be cut so that the gift card is either vertical or horizontal.  In the photo below, the gift card is horizontal.
  • Add any mats for the center section, then glue ONLY the sides and bottom of the center section, forming the pocket to hold the gift card.
  • Decorate as desired!
  • There is a variation for this card:  the center section can be glued to either side of the card inside, so that the card pocket stays put.
The finished size is 5-1/2"h x 4"w


An A2 sized envelope will work for this, but I made a top-fold envelope to fit these cards. 
  •  start with an 8-1/4 x 9-1/2 envelope weight paper ( I use 65lb. paper) or coordinating cardstock

  •  with the 9-1/2" side at the top of the scoring tool, score at 2-1/2" and 6-3/4", top to bottom
Score @ 2-1/2 "


Score @ 6-3/4"


    • rotate to the 8-1/4" side and score at 3/4" & 6-7/8", top to bottom
    score @ 3/4''


    Score @ 6-7/8"

    • cut away the four corners, at slight angles for a nice fold
    • use a corner rounder on the 1-3/8" flap, 3/4" flap and top of the large flaps
    Showing cut-away corners and rounded edges
    • fold the two large flaps into the center and glue

    • fold the 3/4" flap up and glue
    Assembled envelope 4-1/4 x 6" when closed

    • embellish the top flap with  patterned paper to match the card to be placed inside using a 1-3/8 x 4-1/4" strip with two corners rounded to match the flap
    Tip:  If you tend to over-embellish cards that are too thick for a normal envelope, you can make an envelope box by adding 1/2'' to the length and width (now 10 x 8-3/4'').  For this size, score the 10'' side @ 2-3/4'', 3'', 7-1/4'' & 7-1/2".  Score the 8-3/4'' side @ 3/4'', 1'', 6-1/4'' & 6-1/2''.

    Cosmo Cricket and SEI papers and embellishments were used for these cards
    red ruffled ribbon: Recollections
    red glitter ribbon: JoAnn
    EK Success punch-Edger Flourish Scroll
    Wausau Pearlized card stock (red & green)
    Christmas Stamps  / Red Stazon


    I hope you enjoyed the tutorial.  Come back to the blog soon!

    Be Inspired!

    Jules

    Monday, November 19, 2012

    Crate Paper Acorn Avenue Layouts

    Hello bloggers!  Up today on the blog are layouts made for my DT gig at The Scrapbooking Studio in Bloomington, IL.

    Acorn Avenue, by the title appears to be a fall paper line, but it truly is not!  There may be one side of one of the papers that is fall themed, but the remainder is very random and could be used for just about everything!

    For the first LO, I went with a fall theme, due to the great fall photo I had to work with! Stitched squares, red frame, gold matting and title were also cut with the Cricut.  The gold frame was a little much for the layout, so it was stamped with Tim Holtz stamps (fabulous flourishes, curiosities and haberdashery) to tone it down a bit.
     The title has hidden journaling attached to it and tucks into a pocket at the top of the frame.
     Embellishing the layout are Prima bling, paper flowers cut from the patterned paper, and an edge punched strip.


    A little more detail on the stamping.  The red mat is also stamped, but the camera did not pick it up well.


    OK. Next LO ~ Don't laugh......I mean it!


     The paper used to cut the squares on the first LO was used as the background for this page.

    The picures used for this LO have been stashed in a photo box for many years and this paper line was just what they needed!
     Each little square was layered up with patterned paper and topped with a title letter.  The leftover space received a chipboard squirrel!
    the right side of the LO has layers of patterned paper and border stickers, along with some random chipboard circles, journaling sticker and paper flower, all from the Acorn Avenue line.

    Stop by the Studio to get your Crate Paper supplies today....

    and.........Be Randomly Inspired!

    Jules

    Friday, November 2, 2012

    Teresa Collins Christmas Cottage Card

    Hello Bloggers!  Up today on the blog is a card made with the TC Christmas Cottage line and some POW! glitter paper provided for my crafting pleasure from The Scrapbooking Studio in Bloomington!


    It is a matchbook card with a few layers added in...a Fabrications brad topped off the layered die-cut flower from the line.  It was painted with Tattered Angels Glam in purchased during one of the TA classes held at The Studio last summer!  Fun!

    The next layer down is the POW paper.  It is very glittery!  The matting layers were reversed for the "strike" area on the matchbook and it was topped with a stamp from "Just Rite" (CR-03820 Christmas Vintage Labels One) and die cut with a matching die from Spellbinders Antique Labels One.

    A closer look at the dimension...


    The inside is layered with a gift card pocket and more vintage label dies and stamps and some gems from the TC Fabrications line.


    I must say, this was a beautiful line of papers and embellishments to work with!  Thanks TSS!


    Thursday, October 4, 2012

    Distress Me

    Hello Bloggers!  Sorry, I have been absent from the blog.  It was wedding prep for a week or two!  More pics on those projects later.

    Today, I am sharing a little storage project (very plain~sorry!).  You see, I keep the foam blending pads for Distress Ink in little ziploc bags.  There were so many of them, they needed some better organization.  Something that could be kept out in my scrappy space, but could also be portable to go to a class or crop.

    This is how it will look when transporting to a crop:


    Contents, with a little room to spare!


    Base sitting inside the box lid...


    Quick Quotes to the rescue!  Some Julie Je'taime paper formed a box base and lid with the Martha Stewart Scoreboard; an EK Success punch (Large Journal Plate & Bracket) cut the label for the box lid; Hero Arts alphabet letters stamps and Dusty Concord Distress Ink were used for the title and dragonfly accents.


    More projects coming soon!  Be Inspired!  Jules

    Tuesday, September 25, 2012

    It's time to share a card

    Hello everyone!  Thanks for stopping by today!

    Today's post is a "re-do"  of  a  Personal Shopper Cardmaker kit from Paper Wishes.  This card comes from the July 2012 kit -click here to see what the original design looked like.

    Now, here is my take on the project; the orientation was changed and the inside was turned into a birthday greeting.  A little resin rosette (Paper Studio-Hobby Lobby) was added to the center of the bow.


    The inside papers mimic the outside.  How about this cute stamp!  I picked it up at CKC in Collinsville this summer.  It is from Rubbernecker.com here.

    Thanks for peeking in today!

    Be Inspired!
    Jules

    Sunday, September 16, 2012

    BoBunny Apple Cider Card

    Hello Bloggers!  Thanks for stopping by the blog today!

    Up on the blog today is another design team project for September from The Scrapbooking Studio in Bloomington.  BoBunny Apple Cider papers were used on this month's projects, with a few extra goodies from my stash!

    These papers were just great to work with.  Every project inspired the next with all the great pattern and texture, not to mention the fabulous fall colors!

    Tell me, is this 3D little girl sticker about the most adorable thing?  She even came with her own bling already attached!

    She is sitting on a burlap "rug" which was glued to a piece of cardstock before attaching to the card front.

    The frame was hand cut and re-sized from one of the papers in the Apple Cider line.  It nicely framed this adorable girl.

    The "label" at the bottom of the card is one of the Trinkets which match the line, threaded with burlap and attached to the back of the layers before mounting on the card base.


    The card base is orange Bazzill.  A Tim Holtz Elegant Flourish stamp was used with Rusty Hinge Distress ink on the inside left of the card.  A few paper strips, a journaling block and a phrase sticker from the coordinating sticker sheet finished off the card.

    A close-up of the label, 3-D sticker and burlap.

    Stop by The Scrapbooking Studio today to get your BoBunny supplies!


    Check in soon for some more BoBunny inspiration!
    Be Inspired
    Jules


    Tuesday, August 21, 2012

    Chocolate Dipped Artful Cards -1

    Hello bloggers!  Well, I finally got to play with my Artful Card kits from Paper Wishes!  The kits come with coordinating card stock die cuts, papers, sentiments and ribbon ~ and they are oh, so  pretty!  This one is called Chocolate Dipped.

    A2 cards and 2 patterned papers were run through the Big Shot with the Sizzix Card Fronts, A2 Eyelet & Ornate die.   after die-cutting the papers, they were put into the paper trimmer and cut about 2/3 down from the top, so that they could be alternated on each card.  Button die-cuts trimmed with ribbon were placed across the 'seam' with foam tape and two more die cuts were layered on for lots of dimension.  

    The stamps used for the sentiments were stamped with Versafine Vintage Sepia.  The stamp sets used were, of course from Paper Wishes:  Birthday Greetings and Stamp & Punch.


    After the greeting was stamped on the patterned paper, it was punched with a 2-1/2"  punch. A 3" scallop circle punch was used for the mat layer.  After I saw the inside photo, I decided it needed a piece of knotted ribbon attached ~ sorry, no pic!


    This is a shot of the dimensional elements.


    This is the second card, with more layered die cuts and a pretty bow, laced through one of the die cuts.
    ...and the inside...

    All the pieces were inked with Vintage Photo Distress Ink.  I am really happy with the turnout.  Stay tuned to the blog for more Chocolate Dipped cards, coming soon!

    Be Inspired!  Jules

    Monday, August 20, 2012

    The last of the 7gypsies cards...

    Thanks for stopping by the blog today!  I have more 7gypsies cards to share. Are you getting tired of them, yet?  I promise, this is the last post!


     As with the previous cards, kraft card stock was run through the Big Shot with the Sizzix Card Fronts, A2 Eyelet & Ornate die.   For these, one of each style was cut.

    A piece of patterned 7gypsies paper was cut to fit just above the ornate edge, then edge-punched with an EK Success Edger punch, Elegant Flourish Scroll.  The sentiment (an old SEI stamp) was stamped with Distress Embossing Ink and heat embossed with black embossing powder.  All the card edges were inked with Victorian Velvet Distress Ink and a blending tool.


    For this card, another piece of patterned paper was cut to fit the top 2/3 of the card base.  To that, two edger punches from EK Success were used to keep the circle theme going ~  Donut Chain and Bubbles.  The little frame was fussy-cut from another piece of the 7gypsies patterned paper and letter stickers were used to spell "thank you."  Foam tape was used to give the sentiment some dimension.


    A little ribbon from my stash tied into a triple bow with Becca's  Peg Bow Maker, topped off each card.

    Thanks for stopping by today!  Be Inspired!  Jules

    Sunday, August 19, 2012

    7gypsies Embossed Ornate Cards

    Hello scrappy blog friends! Happy Sunday!   This is the second set of  cards from the 7gypies Trousseau Collection from the Scrapbooking Studio.  For these cards, A2 cards and 7g background papers were run through the Big Shot with the Sizzix Card Fronts, A2 Eyelet & Ornate die. 

    The Thank You focal, again, an old SEI stamp set (Windsor?) was stamped in Versafine Vintage Sepia, then the scrollwork was added around the edges with Victorian Velvet Distress Ink.  The ovals were punched with Marvy Uchida oval punches in 2.5 & 3 " sizes, then tapped on the edges with Victorian Velvet.

    The background papers were run through the Big Shot with A2 embossing folders from Sizzix : Thanks set and Tim Holtz Fancy Frame.  Victorian Velvet ink was tapped over the top of the embossed images to add dimension.

    A little ribbon from my stash (dotted ribbon below is from Quick Quotes), tied into a double bow with Becca's  Peg Bow Maker, topped off each card in this set of four.


    Thanks for peeing in today!  Be Inspired!  Jules

    Friday, August 17, 2012

    7gypsies Embossed Eyelet Cards

    Hello fab bloggers - Back today with some more 7gypsies "Trousseau Collection" from The Scrapbooking Studio.  

    For these cards, A2 cards and 7g background papers were run through the Big Shot with the Sizzix Card Fronts, A2 Eyelet & Ornate die.  This is a great way to mass produce cards.  There are two card styles on the die, so 2 cards or 6-8 card fronts can be cut all at once!

    For the Thank You focal, an SEI stamp set (Windsor?) was stamped in Versafine Vintage Sepia, then the scrollwork was added around the edges with Victorian Velvet Distress Ink.  The ovals were punched with Marvy Uchida ovals in 2.5 & 3 " sizes, then tapped on the edges with Victorian Velvet.

    The background papers were run through the Big Shot with A2 embossing folders from Cuttlebug (Birds & Swirls) and Sizzix (Regal Flourishes).  Victorian Velvet ink was tapped over the top of the embossed images to add dimension.

    A little ribbon from my stash (dotted ribbon below is from Quick Quotes), tied into a double bow with Becca's  Peg Bow Maker, topped off each card in this set of four.  A little more info on this bow maker.  I am really picky about my bows and this little jewel takes all the muss and fuss away, and the bows come out beautifully!  Check out Becca's blog here to see her beautiful creations!


    Thanks for peeking in on the blog today!  Be Inspired!   Jules